Thursday 21 December 2017

7 weeks of Christmas

Good morning Stashers.  Welcome to the final instalment of 7 weeks of Christmas.

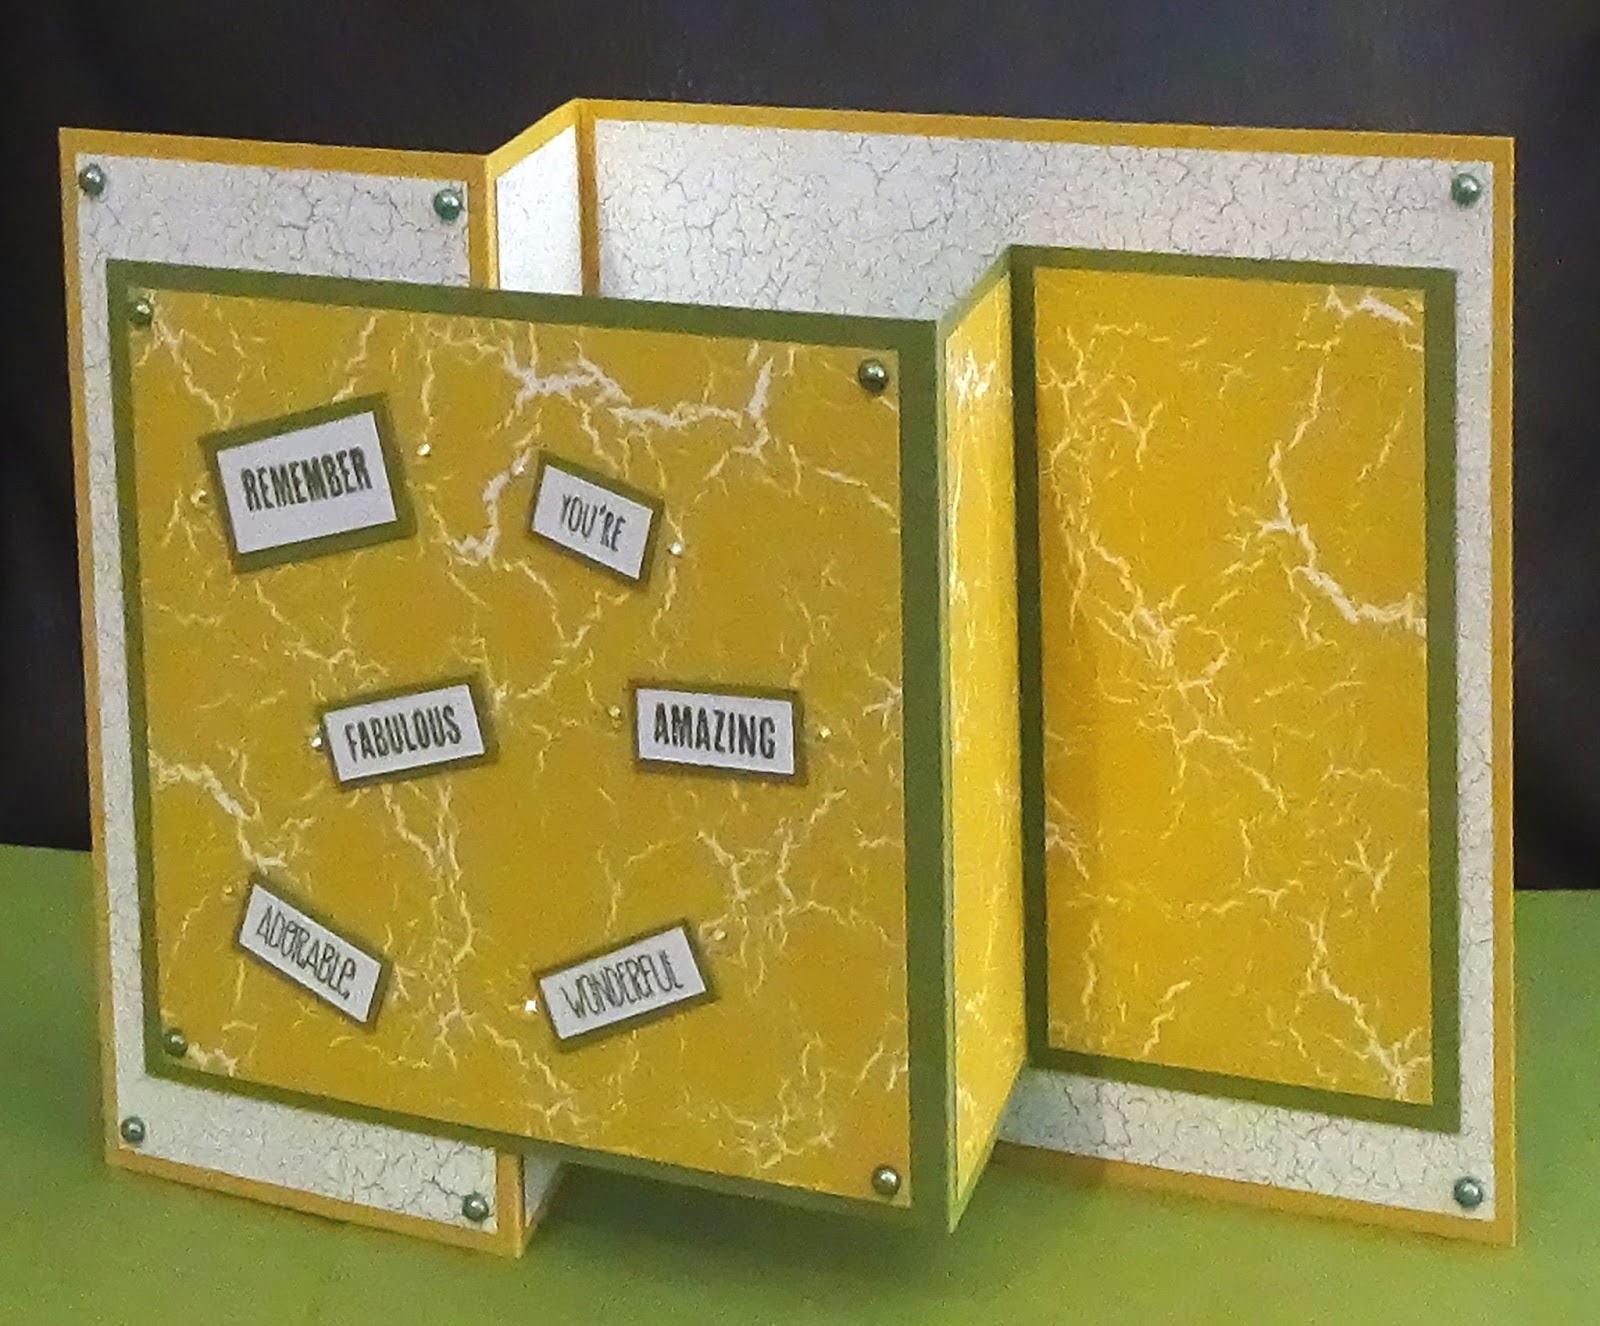
For this last card I have made a diamond fold/spring fold card.  These are quick and easy to make and depending on how you dress them up, you can make them look really fancy or simple and effective.


For this card I used Very Vanilla card stock - 106550  and some DSP from the Eastern Palace suite - 144147 and finished off with an Eastern gold vinyl sticker - 144150 from the same suite.


If you would like to see how it is made, check out the video above.

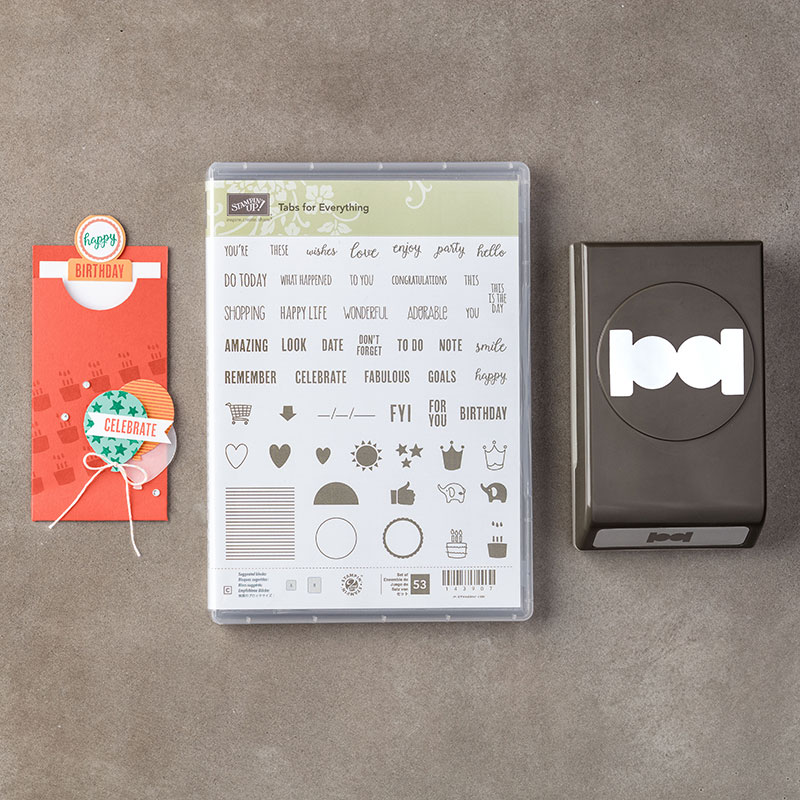
We have a new catalogue that goes live on January 3rd, so I have been busy making samples to show you from one of the new stamps sets.  I have been using a lot of bright colours, which any one who knows me will tell you, this is not the norm lol.

There are lots of special offers coming up.  I can't wait to share them with you, but if you are looking for a last minute crafty deal, remember to check out the Year end sales event.  There is a link in the side bar.  Also the Clearance rack has been refreshed.  Prices start as low as £1.30 and there are loads of bargains to be found there as well.  When ordering, please chose me as your demo.  You can find out how by clicking "Your personal shopper"

If you haven't already, please follow my blog so that you can stay up to date with what is going on and the new tutorials that I hope to share with you.

Thanks for stopping by 😊

Ny x

Wednesday 20 December 2017

7 weeks of Christmas parts 5 & 6

Hi Stashers.  I have another two cards to share  with you today.

This first card was totally unplanned.  I grabbed an arm load of stuff and had a play.  Check out this video to see how this card was made.


I love crafting like this, just grabbing a few things and seeing how the project turns out.


I'm not good at simple cards.  I keep wanting to add more stuff to fill in the spaces, but I managed it with this double Z fold card.


I chose Very vanilla - 106550 and Berry burst - 144249 card stock for this card along with the berry burst ink pad - 144083.

Double Z fold cards are super easy to make, they just look complicated.  They are a quick make too once you know what you are doing, so you can make something wow in no time at all.

I think of all of the colour combos that I have used for Christmas cards this year, this is my favorite.

I have one more card to share with you, which I will post tomorrow.  I hope you are all managing to stay warm (it's very cold here in the UK at the moment) and toasty.

Thanks for stopping by.

Ny x

Tuesday 19 December 2017

7 weeks of Christmas parts 3 & 4

Good morning Stashers.  Things have been so busy in the run up to Christmas that I am behind on my blogging and I have so much to share with you.


For this first card I used the Hometown greetings edgelit dies - 144671 to make reusable stencils.  Watch the video below to find out how this card was created.


There are so many dies that you can do this with and this is just one of my favourites.  If you cut off the snowmen and trees, this card would work for a new home card and so much more throughout the year.

I used Smoky slate - 131291 to make the card base and Berry burst - 144249 for that pop of colour.

When you are making stencils this way, it's not just the die cut that can be used.  Take a look at the negative space (the card that you cut your die from), can that be used?  A lot of the time it can.


For the fourth card in this series, I used the Color theory suite.  The Memories and more card pack - 144210 is choc full of cards that allow you to make greeting cards quickly and easily.  I used three in on this card along with some of the Color theory designer paper - 144193.

Such a simple card to make but oh so effective and you could dress it up with all sorts of embellishments.

I have already started making samples to show you featuring products that will be available from January 3rd.  I can't wait to show you.

Please follow my blog so that you don't miss out on what is coming next.

If you haven't already, then subscribe to my youtube channel and join my group on Facebook.  You can find the links to both in the side bar.

Happy crafting every one.  Thanks for popping by.

Ny x

Thursday 14 December 2017

7 weeks of Christmas part 2

Hi Stashers.  Today I would like to share with you my second video in the 7 weeks of Christmas series.


Featuring the Card front builder thinlit die set - 144674 and the Hearts come home stamp set - 145416 this card is super easy to make and doesn't take that much time either.

I love elegant eggplant, so that is the main colour that I have used and I think that Tranquil tide is the perfect green for projects like this.

Please check back tomorrow for another video in the series.

Take care every one and thank you for stopping by.

Ny x

Tuesday 12 December 2017

7 weeks of Christmas part 1

Hi Stashers,  I hope you are all managing to stay warm now that the weather has turned so cold.

I'm playing catch up, so today I would like share with you part of a collaboration that I have been doing with my friend and upline Tina (Ivory Moon).

Every week for seven weeks, Tina and I are sharing videos (Tina is doing hers live) showing you how to make a Christmas card or project.

Now I am behind on my blogging so I will be posting the first four videos over the next few days.


This is my first project featuring the Paisley framelit dies - 141849 
Check out the video below to see how it was made and what else I used.


This was a fun make as I really wanted to show that just about any of the die sets could be Christmasy if you thought about it.  I love how the flower in the middle turned out.  I can see me using that flower in different colours on other projects 😊

Thank you for stopping by.  I will be posting week two of the 7 weeks of Christmas tomorrow.

Please follow this blog so that you can see all of the new posts as they happen.

Catch up with you all soon.

Ny x


Thursday 23 November 2017

Craft Life

Hi Crafters.  I wanted to share a little with you about my crafting journey.

I originally got into paper crafting about twelve to thirteen years ago, doing scrapbook layouts and cards that looked like this.  My photography work has improved a bit since then thank goodness lol


Over time I learned new techniques (thank you Youtube posters) and my card making started to improve a bit.


After a few years I started feeling a bit limited by cards as I wanted to go more 3D and I started to decorate boxes.


I was in my element for quite a while I can tell you. Working with 3D projects meant learning new skills and taking my crafting further than I had imagined at the start of my journey, but I still wanted more.  It was about this time that I discovered mixed media and started playing with canvas.


There were some serious "Girl what were you thinking?" makes, but I kept going because inky or paint covered fingers are my happy place.

I keep coming back to paper crafting though.


I love being a Stampin' Up demonstrator.  There are so many quality products to play with and I am looking forward to seeing where it takes me next in my crafting journey.


Thanks for visiting.

See you soon with my next make.

Ny x

Monday 13 November 2017

Stamparatus

Hi Stashers.

I'm so excited I am wiggling in my seat.

I went to the twice yearly Stampin' Up conference on Saturday and one of the items that they showed us was the Stamparatus.

Before I start raving about all of the ideas I have for using it, here is a video explaining it to you.


I think this is perfect if you want to make invitations, mass produce cards, prep for classes or just make sure that your own stamping comes out perfect every time.

I love the fact that you can stamp in exactly the same place multiple times to create a more saturated colour using just one ink pad.  Creating your own perfectly lined up back grounds will be a breeze with the Stamparatus.

I need to stop a breath for a minute lol


Did I mention creating your own scrapbooking backgrounds with the Stamparatus?  The Stamparatus is open on two sides, allowing you to easily create your own 12 x 12 inch backgrounds and design paper to match the photo that you are working with.

The Stamparatus retails at £44.  If you would like to know how to reserve one for yourself, please feel free to get in touch with me via my page on Facebook  The Stampin' Stashers

Or by email: thecraftystashers @ gmail . com  (you will need to remove the spaces)

I'm off to scribble down more ideas.

Catch up with you all soon.

Ny x

Thursday 26 October 2017

Because I'm HAPPY

Good morning crafters.  I managed to fit in some play time today and decided it was time to get inky in the best way.

I love making mixed media creations and I wanted to see if I could do it with my Stampin' Up stash.  This is what I made


I started off with a sheet of 12 x 12 Crumb cake card stock from the Neutrals best 12 x 12 cardstock pack.   A lovely blank canvas to work with and the colour is a perfect match for the mushrooms at the bottom of the picture. 


I took a piece of Tempting turquoise card stock (it was the closest match I had to the blue in the photo) and distressed it a bit with my scissors before going around the edge and adding brown paint using my finger. With that done, I was able to work out a rough position for where the photo would go before I started stamping.

I used Early expresso ink on the edge of a Timeless textures stamp to create the vertical line and then added two different strips of Year of cheer speciality washi tape to add a little shine and to use as a guide for my stamping.


Most of the stamping was done using this stamp from the Timeless textures set.

You can see a closer view below of how that turned out.


I also used this stamp from the Charming stamp set (retired) on the top left of the layout.


Once I was happy with the back ground, I used ink refils (Pacific point and Early expresso) and a little mica powder in a mister spray bottle to colour white flowers to match my project.  I also added some 2mm flat backed pearls for added interest.  I am not good at minimalist, so I am always looking for ways to add texture or layers.

Lastly I die cut happy birthday using the Happy birthday thinlits die from a piece of Early expresso card stock and trimmed off the happy to use as a title for the layout.

I hope you like it.  If you have any questions or suggestions about this layout,  I would love to hear from you.

Thank you for stopping by.

Ny x

Shopping list
Neutrals best 12 x 12" cardstock pack - 145411
Tempting turquiose  - 108598
Timeless textures stamp set - 140517
Charming stamp set (retired)
Early expresso ink pad - 126974
Happy birthday thinlits die - 143700
Year of cheer speciality washi tape - 144644
Pacific point ink refil - 111840
Early expresso classic ink refil - 119789

Friday 20 October 2017

Playing with paisley

Hello Crafters.
Today I had some play time and I decided to have my first play with the Paisleys and Posies stamp set and the Paisley framlits dies.


I decided to work with Cherry cobbler, Crushed curry and Elegant eggplant which are all colours in the regal collection.  The colours are so rich and work so well together.


I started by creating a card blank using the crushed curry.  I then took a piece of cherry cobbler and die cut three of the leafy fan shape design, making sure to keep the bits that I cut out.

I then created my background using  various stamps from the  Paisleys and Posies stamp set using a cherry cobbler Stampin' write marker to ink my stamps.  They are very juicy, so embossing using these pens should be a dream.  I'm looking forward to trying that out.

I then adhered my cherry cobbler background onto my card blank.

I stamped Blessed on to an off cut of crushed curry using an elegant eggplant Stampin' write marker to ink my stamp.  I had to mask off part of the stamp to do this.  I matted the crushed curry sentiment onto a piece of cherry cobbler and then double matted on to a piece of elegant eggplant and adhered the sentiment to my card using foam adhesive strips.


I die cut three of the leafy fan shape designs from a piece of elegant eggplant, again keeping all of the bits that were cut out and glued them into place in the apertures I had created in the cherry cobbler background.  I finished off by adding some of the cherry cobbler cut outs and some rhinestones that match the card.

I hope you like it

Thanks for stopping by.

Ny x

Shopping list
Elegant eggplant A4 Cardstock - 108614
Cherry cobbler A4 Cardstock - 121681
Crushed curry A4 Cardstock - 131288
Paisleys and posies stamp set - 142196
Paisley framelits dies - 141849
Regal Stampin' Write markers - 131262
Foam adhesive strips - 141825

Wednesday 18 October 2017

Christmas pop

Hi Crafters

I love to challenge myself either by making something I have never tried before or trying to make something that is completely outside of my comfort zone (I learned to appreciate pattern this way).

This time I wanted to make a pop up card, but I also wanted to make a block step card.  I've not tried either technique properly before.  Well I did say that I like a challenge lol

 
I started by using two sheets of Tranquil tide to create my card blank.  The card measures 8x6 inches.


I cheated a bit with the box stepper part as I used a pre-bought blank.  I WILL learn how to make them from scratch, but I needed to make this card faster than I would be able to work it out (I rarely work from tutorials).  I used a piece of Cherry Cobbler to cover the front of the block step portion.


Through out the card I have used Very vanilla, Cherry cobbler and Tranquil tide.  I used a sentiment and the trees from the Hearts come home stamp set inside the card.


The front of the card was a lot of fun to make.  I used the Hearts come home stamp set again to stamp Santa and "Joy to the world" and a few sparkles around the reindeer.  I couldn't resist adding some AB bling in a trail behind the sleigh.

I finished off the card by adding die cut trees and a deer from the Card front builder thinlit dies set

This was a fun card to make and I am pretty sure that I will be making another one soon.

I'm going to head off as I have another idea for a card.

Thanks for stopping by

Ny x

Shopping list:
Tranquil tide A4 card stock - 144252
Cherry cobbler A4 cardstock - 121681
Very vanilla A4 cardstock - 106550
Hearts come home Stamp set - 145416 or 145413
Card front builder thinlit dies - 144674

Friday 13 October 2017

A little bit of what you fancy

Hi Crafters,

Some times a little bit of what you fancy does you good and for me today that was a fancy fold card.


For this card I worked mostly with the Eastern Palace suite.  All of the designer papers that were used are from Eastern Palace as is the tranquil tide cardstock.


I wanted a pop of colour in the middle, so I went for Berry burst which is from the In color 2017-2019 collection. 


I just had to have a play with the Eastern gold vinyl stickers.  This is a really easy card to make and it folds flat for posting.  I made mine to fit into a 6x6 envelope, but you could make taller or bigger versions.

Items used:

Eastern Palace designer series paper - 144147
Tranquil tide A4 cardstock - 144252
Berry burst A4 cardstock - 144249
Eastern gold vinyl stickers - 144150
Thankful thoughts clear mount stamp set - 141522
Elegant eggplant stampin' pad - 126969

Thanks for stopping by

Ny x

Tuesday 10 October 2017

Take a closer look

Hello Crafty Stashers.

I have been working on a series of videos to give you a close up view of some of the products that Stampin' Up have to offer.  My plan is to do more and share with you ideas that I have for what they could be used for.

From time to time I will post them as a blog post, but if you would like to see the full list of product  videos that I have created, please click on the link on the left hand side of the blog called Product focus.

In today's video I would like to show you the Kraft 6" x 8" album cover 144764 and the Variety pack 6" x 8" photo pocket pages 144205


Thank you for stopping by 😊

Happy crafting

Ny xx

Friday 6 October 2017

Dear Christmas...

Hi  Crafty Stashers.

I have never been one for traditional Christmas cards.  It's not that I can't make them.  I can, but my brain just doesn't really go there. 

For this card I decided on a pink and blue colour scheme.


This is quite a simple card.    I started by cutting a piece to measure 5.25" by 5.25" from a sheet of designer paper from the Bundle of love 12"x 12" pack.  I selected a die that was big enough to frame the embellishment that I wanted to use and created an aperture in the pink patterned paper using the bigshot.

Next I cut a piece of Soft Sky card stock to measure 5.5" by 5.5"

Using the same size nesting die that I used to cut my aperture and the next size up, I created a frame using more of the Soft Sky card stock. 


Now it was time for assembly.  I threaded some Whisper white 1/8" sheer ribbon through my embellishment, making sure that it was long enough to go from just above the aperture to where I wanted it to sit.  I also added a double layer of foam adhesive strip to the back of the embellishment to make sure that it would sit exactly where I wanted it to.

I used tape to secure the ribbon to the back of my pink piece.  Next I glued the frame on the front of the card making sure that it lined up properly with the aperture I had created.  I then matted the front of the card onto the Soft Sky card that I had cut to size earlier.

I took a sheet of Whisper White A4 cardstock. I cut it to measure 5.75" wide and then scored down the middle to create my card base.  All that was left to do was to attach the card front to the card base and add a sentiment.

Still working with the original sheet of Soft Sky cardstock, I stamped "Merry & Bright" from the Hearts come home stamp set.  I then punched my greeting out using the Every day label punch.


I trimmed down both of the longer sides so that I have what you see above.  I added my greeting to my card using more foam adhesive strip and added a couple of tiny gems.

Shopping list
Bundle of love  144143
Soft Sky card stock 131292
Whisper white 1/8" sheer ribbon 144172
Foam adhesive strip 141825
Whisper White A4 cardstock 106549
Hearts come home stamp set 145416
Every day label punch 144668

Thanks for stopping by.
Happy crafting.

Ny x

Tuesday 3 October 2017

Hearts come home

Hi Crafty Stashers.

Last week I told you about my favourite bundle from the Autumn?Winter Catalogue.

Hearts Come Home Clear-Mount Bundle146068
Hearts Come Home Wood-Mount Bundle146065

There is so much to play with in this bundle that I haven't explored it all yet, but here are the first few cards that I have made featuring some of the thinlits in this bundle.

I have shown this first one to you in an earlier post.   I will be creating a tutorial soon on how to make this card.  It is so easy to make and all you need is two sheets of cardstock.  I used Dapper Denim 141414 and Whisper White 106549

This is a new home card that I created using the same thinlet dies, but you could just as easily do this using the stamps in the bundle.  I just wanted to show that, even if you only buy the thinlet dies, they can still be used for a variety of themes.  For this card I used Whisper White 106549, Soft Sky 131292 and Old Olive - 106576 cardstock.  I also used Whisper White 1/8" Sheer Ribbon - 144172

This is my wedding card using the same thinlit set.  I haven't added a sentiment yet as I want to order Floral Phrases - 141767.  

For this card I used Soft Sky 131292 and Blushing Bride - 131287  cardstock, Whisper White 1/8" Sheer Ribbon - 144172, Bundle of love speciality designer paper - 144143 and Gold foil sheets 132622.

Thanks for stopping by.

Ny x


Friday 29 September 2017

Not just for Christmas

Have you seen the Autumn/Winter catalogue?  It's not just for Christmas you know.

If you would like to look at the catalogue online click here or you can download a PDF version that you can view off line here.

This catalogue focuses on Halloween/Autumn and Christmas, but you can use the items for so much more.

Snowflakes that aren't just snowflakes 
Foil Snowflakes - 144642

These snowflakes work well alone or layered with a topper, but they can be use for other occasions too.  Take a look at this birthday card that I made.


Bundles of fun

There was one bundle that I just couldn't resist from this catalogue, well maybe more than one, but this is my favourite.

Hearts Come Home Clear-Mount Bundle - 146068
Hearts Come Home Wood-Mount Bundle - 146065

I have made Christmas cards, new home cards and a wedding card using this bundle.  Click here to see one of the Christmas cards.  Keep an eye out for Tuesdays post where I show you some of the other cards that I have mentioned.

Had to have it

I had to buy the washi tape.  I'm a steampunk girl and the colours are perfect.  No matter what your style of crafting, this tape will work.

Year Of Cheer Specialty Washi Tape - 144644

Thank you for visiting my blog today.  Check out the link at the top of the page to see all of the products here and so much more.  I didn't even get started on the Autumn/Halloween stuff that is in the catalogue.

I will be back on Tuesday to show you the cards I was talking about earlier.

Happy crafting

Ny x


Tuesday 26 September 2017

But I want it all...

When I first got my hands on the annual catalogue I started putting post it notes on all of the pages that had items on that I wanted.  It got to a point where I couldn't get back to pages that I wanted to look at because of the forest of tabs sticking out from the top and side of the catalogue.  I now have a spreadsheet with it all on lol

So how do you go about deciding what to order first?  Because most of us live on a budget and spending a months income on crafty stash, just isn't going to happen in one go lol

This is my advice.

Very Vanilla Solid Baker's Twine - 144224

This is very versatile as it can be dyed using ink refills to match your current project.

Whisper White 3/8" Classic Weave Ribbon - 144159

Again, this can be dyed to match your creation

Pick a product suite and work on collecting all of the pieces that you like.  This way you are guaranteed that every thing you have will coordinate.  Click here to take a look at the videos that I created talking about the Color Theory suite.  I am currently collecting the Eastern Palace suite.  I will get a video up for that soon.

The hardest thing for me was buying cardstock.  I wanted ALL the colours NOW.  What I have been doing instead of buying the individual colours of cardstock is to buy the cardstock packs that go with each of the product suites.

Eastern Palace A4 Cardstock Pack - 144149

This pack contains 24 sheets of A4 card stock.  You get three different colours in the pack and there are eight sheets each colour.  This allows me to build up my colours whilst working out which  I will use the most and will need to get a  pack of 24 sheets of.

Another way forward with the cardstock is to buy the assortment packs for each collection.  You will receive two sheets of each colour in that collection. 

Bundles are great.  They typically consist of a set of stamps and either thinlit dies or apunch.  This is one that I have.
Tabs For Everything Photopolymer Bundle - 145364

Pick a bundle that can be used for a variety of different occasions and projects.  I picked this set because I can use it in a planner that I am working on, cards for all ages and also mini albums.  Also buying bundles is cheaper than buying the items individually.

So this is my advice on getting started on your Stampin' Up WANT list.

I haven't talked ink on this post as there is a fair bit in my head that I want to say and I think it will need a WHOLE other post lol

Thursday 7 September 2017

Twinkle twinkle

I've been playing with one of the new die sets that is available in the new Autumn/Winter catalogue.


This is the first of three cards that I made.


This die set is very versatile and not just for Christmas.  It can be used for lots of different occasions such as new home, weddings or even a birthday card.

This card was created using:
Hometown Greetings Edgelet dies - 144671
Dapper denim cardstock - 141419
Whisper white cardstock - 106549

Wednesday 26 July 2017

My first ZZ

Yesterday I set myself a challenge:  To use yellow (I avoid at all costs) and to make a type of card that I have never made before and this is the result.


I have never made a double Z fold card before, so it was fun trying this out.  It was a lot easier than I thought it would be. 


I have been making cards for non-specific occasions so that they can be given out at any time of the year.  This one is for any one that is feeling down and needs a boost.  (Nothing better than the postie bringing you a nice surprise when you feel down)


I have seen so many variations on this card, but this type was my favourite.


This card folds flat to go into an envelope.

For this card I have used :
Colour Theory designer series pack - Item code 144193
Crushed curry A4 cardstock - Item code 131288 or 131284
Old olive A4 Cardstock - Item code 106576 or  131282
Tabs for everything photopolymer stamp set - Item code 143907 or 145364

Click on the how to buy from me tab at the top